What is it? - Every now and then, new tools come along that break every convention and force you to think in brand new ways. Concourse is such a tool, but is it usable or just a fun thing to play with?

Concourse: The new "thing-doer" on the block
During the last decade we have grown accustomed to seeing brand new technology, arriving with a beautiful design and a slick user interface, right from the start. Just pick it up and start using it. Think smart phones, electrical cars or social media. The first iPhone was a revelation. Right out of the box, the UI was really intuitive. No user manual needed. The same with FaceBook. Point, click and try it out. Intuitive and easy. For a lot of new gadgets and services it holds true that if you have to explain something, the product will fail.
This has not always been the case. For years, cars, TVs and computers came with detailed installation and user guides that were necessary for most users. TVs came with thick books of step by step explanations on how to wire it up and tune in the channels. Most people struggled to set things up correctly, but when they did, the new gadget eventually provided the anticipated joy.
You could be forgiven for thinking that those days are gone, but living on the cutting edge of technology will teach you otherwise. Concourse is a new and revolutionary “thing-doer”. Most users think of it as an alternative to build tools like Jenkins and Travis, and that is its primary raison d'être. But it is so much more, and the way it is built is so different that you really have to sit down and study it carefully to release it's full potential.
Concourse overview
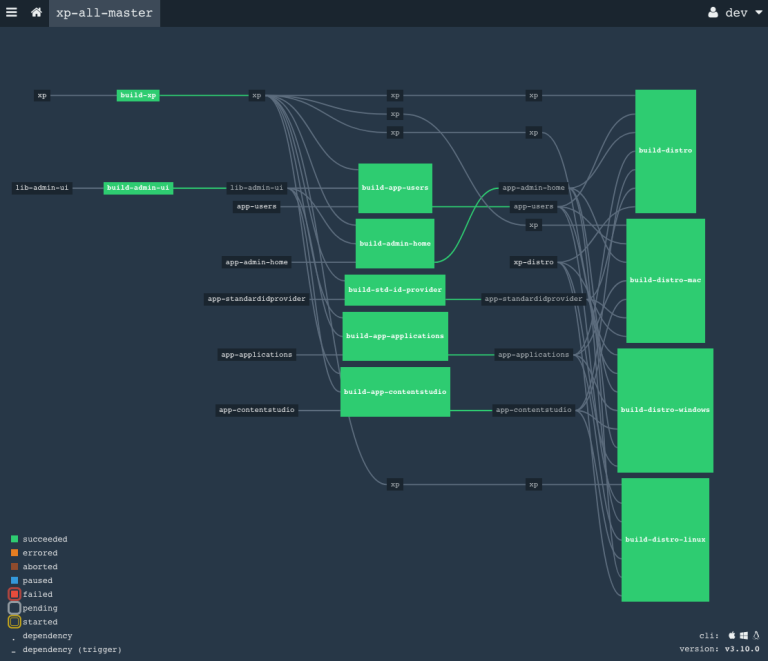
The number one reason to choose Concourse, is the flexible pipelines. Sure, Jenkins has pipelines too, but are nowhere near to the flexibility in designing the flow of tasks that Concourse has. This one feature is the main reason we chose Concourse in Enonic. Despite a lot of other hassles we had to overcome, we are not aware of any other tool where we could create the setup we needed. This is also the reason Concourse exists. The vision for Concourse was a modern build engine, taking advantage of newer technologies, that could do pipelines without all the plugin dependencies of Jenkins.
The number two reason to choose Concourse, is the container architecture. The inception of Concourse came as late as 2014, and it has been designed to work in the cloud. Each build (or thing to be done, if you like), is done in a separate container, started for the task at hand and removed after the task completes. This makes it cumbersome to keep state between steps in a pipeline, but it also creates fully isolated processes that are highly manageable, and scaling is a breeze. If there ever was a tool that lives up to the old Object Oriented adage, “High cohesion, low coupling”, it must be Concourse. It is pretty much not possible to do high coupling with Concourse.

Other nice things about Concourse includes a fancy UI and simple configuration management.
On the other hand, it feels immature in many ways and lack some basic features:
-
There is no trigger function to run regular tasks (for instance nightly builds or tests) at a set time. The closest you come, is an interval timer that can run the task at regular intervals, like every twenty four hours, but then you have to manually start it, and there is drift, so after a month, the starting time of a regular task may have shifted by 15-20 minutes.
-
While being built on Docker, there are many advanced features of Docker that is not supported. The most notable being support for
docker-compose. Each build step is executed in a Docker container. If the task to be executed needs many tools, they can not be combined from multiple Docker containers, as is recommended, but they all have to be built into the same Docker-image, causing the containers to be more complex than they have to. -
Keeping and transferring state between build steps can be a nuisance. Do you want to push temporary artifacts to a repo, for use in the next stage? Or maybe put them on a file system. It is all up to you, giving you full control, but in some ways, this feels like reinventing the wheel, every time. Hopefully, a future version will have a way of passing files from one step to the next.
-
The fancy UI lacks many basic functions that can only be accomplished from the command line.
The immature feel of Concourse is hopefully set to change, as the team developing Concourse was pretty small for the first three years. In 2018, Pivotal, the company behind Concourse, has expanded the development team and increased the velocity.
Installation
Concourse can be set up on Linux, Mac or Windows, as native installations, or using Docker. It is beyond the scope of this article to go into the details, but a good starting point is the Installation doc: https://concourse-ci.org/tutorials.html#installation-and-configuration
Creating pipelines
The installation has two parts: The server and the command line interface, called fly. Using fly, build configurations are easily updated and managed on the server. The more interesting part is writing the configurations, so it's time to get down to the nitty gritty details. That means we have to write YAML, a data serialization language with the neat, recursive acronym, YAML Ain't Markup Language. There are some really simple examples of using Concourse to write “Hello World” to the log, but if you want to build code, it gets a little more complicated. A typical build configuration for a simple Gradle project, will look something like this:
resources:
  - name: app-xyz
    type: git
    source:
      uri: https://github.com/enonic/app-xyz
jobs:
  - name: build
    plan:
      - get: app-xyz
        trigger: true
      - task: build
        config:
          platform: linux
          image_resource:
            type: docker-image
            source:
                repository: gradle
                tag: '4.10-jdk11'
          inputs:
            - name: app-xyz
          run:
            dir: app-xyz
            path: gradle
            user: root
            args:
              - build
              - publish
Here, we immediately notice the basic concepts of Concourse: resources and jobs. You get resources and do something with them. In this case, the resource is a GitHub project. Resources come in a number of preconfigured types, including the most common source control systems, or you can create your own.
The job is where the action takes place. First you get the named resource, using a trigger. trigger: true is a configuration on a git type resource, that tells the job to execute every time there is new code available in the project. The code is checked out from GitHub and placed in a folder with the name of the job.
Then, the task is performed. Since this is a build, we call it that, but it is only a name. It is not always easy to know if the value of a key/value-pair is a configuration or just a name. Many examples use names that could easily be mistaken for an important configuration, but turn out to be just a simple name that has no significance. If this build is expanded into a pipeline with dependencies on this job, the next job can trigger on the completion of build, but the reference will then be pointing to the job name, not the task. So, in this case, the job-name is a reference, the task-name is just a name with no technical importance.
The entire build is described in the config. Here follows an explanation of the parameters in the example above:
-
platform- required. Important for the technical execution. -
image_resource- required. Every Concourse task run in a container. This parameter describes the container. The type will pretty much always bedocker-image. There are more than half a million different Docker images available for use, and while most of those are not very interesting, there are enough options to do pretty much anything you want in a build. For this build, I have used an official gradle image (https://hub.docker.com/_/gradle/). Gradle continuously update the latest gradle version and make it available with a number of different Java configurations to suit your needs. -
inputs- This reference is a link to the repo resource. The files from the GitHub project are checked out and placed in a root folder named `repo`, from where the builds can be executed. -
run- Defines the command to be executed with several parameters:-
dir- The directory in which the command is executed. Usually, the same as the name of the GitHub project, since the checked out code is placed in that directory. -
path- The command to execute. For gradle builds, this command will always be gradle. -
user- Which user will execute the command. Since the containers are killed after the execution, the root user is the simple solution here, although most Unix experts will probably cringe at seeing root execute simple work. -
args- Arguments on the command line.
-
So, here we have it. A simple script that will start a Docker container with gradle installed, checkout out a Git-repo and run gradle build publish on the contents of the repo.
Since the container is killed as soon as the process is complete, it is important to upload the created artifacts, out of the container before the process finishes. In this example, I used publish as a general example, but exactly what the publish task does and where it publishes the artifacts must be set up in the build script. Also, there could be situations where more advanced reporting is needed:
Advanced usage
In the example above, you see the execution of one single Linux command. This could be any Linux shell command, which is why the Concourse team call their tool a “thing-doer”. For advanced usage, the command could be a script that does more or less anything you want. At Enonic, we have used this feature to run UI tests and performance tests. These require a complex set-up and several tools. Advanced Linux/Unix experts can really take advantage of this to do more or less anything you want. Let me use our UI tests as an example:
Before we can run a script in a Docker container, we need to make sure all the necessary tools are there. I have created two containers for different usages:
-
chrome-node-js – A fairly complex image, containing Chrome with the ChromeDriver for running headless testing, Node JS, Gradle and Java 11 (Java 8 in earlier versions). I am continously keeping the image updated with the latest Chrome, so if you need Chrome, check out if it could fill your need.
-
k6-gradle – A much simpler image, also based on Java 11, but with Gradle and the k6 JavaScript library from LoadImpact. We use this for performance-testing.
Let's look at how to use this. If we take the example up above and change the GitHub repo and some names in the config, we have a start, but a few more things are needed. First, we need to change the image configuration:
source: {repository: sivesind/chrome-node-js, tag: 2.0.2}
Here, I have used a more compact format for the YAML-notation to reduce the number of lines in the config. With this basis, we can run some pretty advanced bash scripts. These could be included in the container build, but then a new version of the container is needed for every change. For really advanced scripts that may be the best solution, but the script can also be included in the Concourse config. Then, changing the script is just a simple upload of the latest script. This is what it looks like:
run:
  dir: ui-testing
  path: bash
  user: root
  args:
    - -exc
    - |
      gradle ((task)) 2>&1 | tee log.out
      result=$(grep "[0-9]* tests completed, [0-9]* failed.*" log.out) || result="Success: $(grep -o 'PASSED' log.out | wc -l) PASSED, $(grep -o 'SKIPPED' log.out | wc -l) SKIPPED."
      curl -X POST --data-urlencode "payload={\"channel\": \"#notif-build-tests\", \"username\": \"ConcourseBot\", \"text\": \"ConcourseBot reports that ((task)) has finished with:\n$result\nSee: https://ci.enonic.io/teams/dev/pipelines/((name))\", \"icon_emoji\": \":airplane:\"}" https://hooks.slack.com/services/T935LT60G/R8YADL51T/FlXJxAyC7klbm7LN
      gradle -PrepoUser=((repoUser)) -PrepoPassword=((repoPassword)) uploadArchives
      if [[ $result = *"failed"* ]]; then exit 1; fi
From above, we remember that the GitHub project is checked into a folder with the name we gave the resource, which in this case is ui-testing. Then, as user root, this config will execute the Linux command bash -exc. These three options are interesting:
-
c: Required: Reads the commands from the following string input and execute them. This is what makes the script defined in the following lines execute.
-
x: Optional: Runs script in debug mode. Very helpful when setting up and debugging a script, but also valuable if a build fails in production. I recommend keeping this in at all times. The performance penalty is minimal.
-
e: Optional: Tells bash to exit immediately if any command exit with a non-zero (error) exit status. This can be valuable, depending on how you want the script to run, but we often leave this out.
Let's look at the script itself. Our goal is to run a script using gradle, then analyze the result, report it and exit with the same exit code that the first gradle command returned. For the curious, there are several random things to note about this script. If you are not doing anything like this, just skip to the conclusion below.
-
First thing to note, is the logging of gradle output:
2>&1will direct everything that is sent to STDERR, to STDOUT, so that everything ends up in the same place. Concourse already grabs everything from both logs and store the result for viewing in the GUI, but we want to analyze the logs, so we also want to store it in a file. By piping everything to STDOUT and then totee, we do not mess with Concourse, but send a copy to the file we have namedlog.out. -
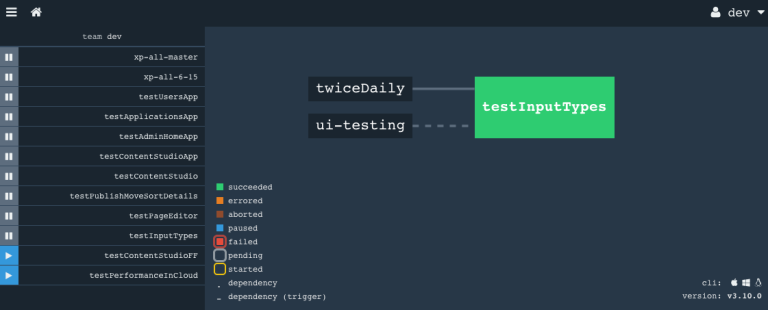
Both gradle commands utilize variables, named inside double parenthesis. Using bash, we have scripted the fly-commands that manage the pipelines. With a few variables, we can reuse the same configuration for each of our tests, so for instance ((task)) is replaced with "testInputTypes" as shown in the screenshot above.
-
The second line analyze the log using grep. The first check is for a standard line in the log, that appears if a test fail. If this does not match, the test has succeeded, and we count how many times PASSED and SKIPPED appear in the log, to create a success message that is more informative than the default.
-
The third line compose a payload for Slack with the result and send it to a known Slack webhook.
-
The second gradle build collects the artifacts from the test and uploads them to our repo. It is very important to move all important files out of the image. Whatever is left when the process finish, is lost, as the container is killed and deleted upon completion.
-
The last line sets the exit code right, in order for Concourse to display the test as green or red in the UI.
Conclusion
Concourse is in many ways a beast of its own. A brand new type of tool, that has its unique usages.
I highly recommend trying out Concourse and use it where applicable. We have not been able to move all our CI work to Concourse. Many of our projects are much more suited for traditional CI systems, but those that need the special features of Concourse would have been almost impossible to do right without it. And then, there are all the other non-CI type of tasks it can do as well!
